

How To Make A Charcuterie Board Out Of Wood
SKIP TO HOW-TO
If y'all're moderately comfy with plugging in a tool, a DIY charcuterie board makes a really great souvenir, especially for a hostess. The meat and cheese serving board takes near 2 hours to make from beginning to cease and looks like you picked information technology up at a Paris antique market place. Honestly, it does!

SKIP right to the tutorial.
Do you remember a few years agone when no one used the word charcuterie board? We called them serving boards, cheese boards, or (shudder) platters. We were such peasants in the olden days, 4 years ago.
Today I'm going to testify you how to make a genuine, false antiquarian meat & cheese board with a hunk of wood from the lumberyard, a jigsaw and a palm sander. And aye. Information technology's the same thing every bit a wood charcuterie board. I'thousand sure y'all've seen antique cheese and breadboards before. They're all over the stores and Cyberspace. Y'all've perhaps even seen DIYs on how to do them, but I'thou going to show yous a few tricks that'll brand your "Antique" serving lath wait authentic.
EVEN if you don't remember you're handy, y'all can do this. Even if you're afraid of power tools, you tin do this. Even if y'all take no artistic instincts any, you can do this.
The full printable tutorial is at the bottom of the post.
How Do You Brand a Charcuterie Board
All in that location is to making a rustic looking charcuterie board is cutting a piece of wood into a shape you like with a jigsaw (or a band saw) and then finishing it.
Because yous aren't looking for a perfect shape or fine woodworking, fifty-fifty a beginner can make an authentic looking board.

- Take hold of your piece of 12″ broad barn board and draw your cheese lath outline on information technology. Yous can find scads of examples of antique serving boards on Pinterest that y'all can use equally inspiration for your shape. Cheese boards tend to be round and staff of life boards tend to be foursquare or rectangular. Simply do what you lot call back looks proficient.
What kind of wood can you utilise?
Pino, spruce or fir: If you're new to things like using saws and cut wood, pick a wood that'southward a softwood and easy to cut. Keep in mind with these kinds of softwoods you lot won't desire to use the boards for whatever actual cut, just equally a serving tray.
Oak, beech or walnut: If yous're experienced and comfy with saws you can choice harder wood like these. Oak, beech and walnut are a lot denser with a closed grain and because of that, they're harder to cut. Those same properties mean you can utilize them as cutting boards because they won't dull your knives or scar hands.

2. Clamp the woods to a sturdy surface like a table or workbench then cut the shape out with a jigsaw.

3. Drill a hole into the eye of the handle if you lot desire a hole to hang information technology from. The size of the pigsty is upwards to you. You can do something merely large enough to run a piece of twine through with a regular drill bit for hanging it, or something a little bigger using a hole saw. Or, you tin can accept no hole at all.

4. Using a palm sander, (a Festool 125 if you're smart enough to ask for one for Christmas) sand the face and edges of the woods. You lot don't want to have overnice make clean cut marks. That'southward a dead giveaway that you're faking something old. If y'all're using one-time befouled board or even barn board that'southward already a fleck discoloured from the lumberyard, once you lot cut it, the edges will wait vivid and new. Bleh. And then sand and circular out the edges.
Subtract the dust of sandpaper you lot're using. Start with fourscore grit, movement to 120 brit and sand again, and finally sand with a 180 grit.

5. Blow off the sawdust from the wood and so use a piece of tack cloth to remove the rest of it.

6. Now the fun part of ageing your new woods, or ageing the newly cut edges of your old wood begins. If you're using old wood, castor the newly cut edges with your mixture of vinegar and steel wool. If you're using new wood, brush the whole board including the edges. Permit dry out. The reason I want you to utilize this technique to stain the wood and not a regular stain is because a) it perfectly replicates anile wood and b) it's completely food safe.
Alternately, you can skip the vinegar and steel wool and simply condition the wood with your food rubber forest finish, which will darken the woods and requite it a glow. Don't forget the newly cut edges!
TIP – By the way if y'all utilize cordless tools and have 1 that has a battery that won't recharge, you should read this post on how to fix a battery that won't charge. If the bombardment is relatively new and not expressionless because information technology's decades quondam yous tin can fix it so the charger volition charge information technology.

Intimidated? Don't be. This is how like shooting fish in a barrel it's going to be.

I made cutting boards out of 3 dissimilar materials. Genuinely old barn lath, new pine and barn lath with lots of scarring and knots from the lumberyard that already looked a tiny bit aged.

There are plusses and minuses to working with both but my favourite was the lumberyard befouled lath that looked a fleck anile. It'south the rectangular one you see higher up. It had the most character, best color after conditioning and y'all can actually use information technology for food, unlike genuine barn board which I would advise against. Because ick. If you desire to use an old genuine befouled board for serving cut a layer of parchment or waxed newspaper to lay on top of the board.
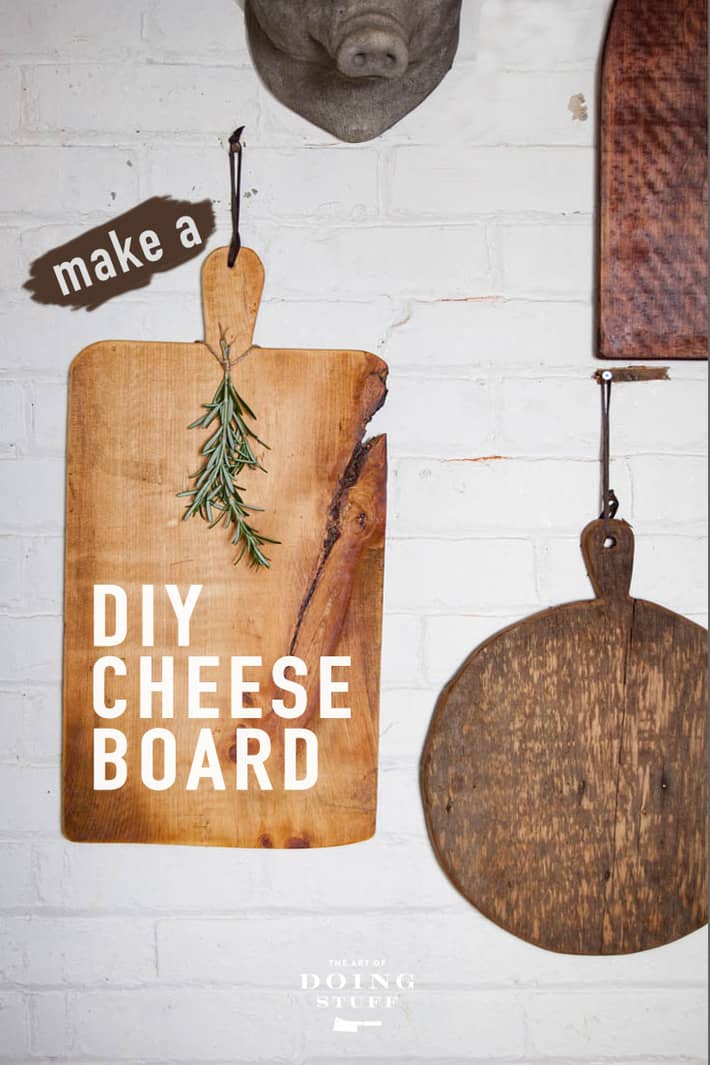
I specifically chose a piece of barn lath at the lumberyard that had a big crack and lots of character.
And then.
Charcuterie board ideas.
This is e'er the big question. If you have one or more of each of the following things, you're good.
- Fresh fruit
- A diversity of cheeses
- Dried fruit
- Nuts
- Olives
- Cured meats
- Soft cheese
- Crackers
- Small pot(due south) of jams or chutneys
Those are your staples for a charcuterie and anything beyond that is going to get you into the serving board superstar realm.
Materials
- A piece of 12″ 10 ane″ soft woods, at least 12 inches long
Tools
- Jigsaw
- Clamps
- Palm sander
- Various grits of sandpaper for sander
- Cotton rags
- Tack fabric
- Piece of chalk
- Lath butter (food form forest conditioner)
- Vinegar and Steel Wool stain
Instructions
- Grab your slice of 12″ wide befouled board and draw your cheese lath outline on it. Cheese boards tend to be circular and staff of life boards tend to be square or rectangular. Just do what you think looks expert.
- Clench the forest to a sturdy surface like a table or workbench then cut the shape out with a jigsaw.
- Drill a hole into the center of the handle if yous want a pigsty to hang it from. The size of the hole is up to you lot. You can do something just big plenty to run a piece of twine through with a regular drill bit for hanging it, or something a little bigger using a hole saw. Or, you can have no hole at all.
- Using a palm sander, sand the face up and edges of the forest. Start with fourscore grit, motion to 120 grit, and finally sand with 180 dust. Yous don't want to accept overnice clean cut marks. That's a dead giveaway that you're faking something old. If you're using old barn lath or even barn board that's already a chip discoloured from the lumberyard, once you lot cut it, the edges will wait brilliant and new. So sand and circular out the edges.
- Blow off the sawdust from the woods and then apply a piece of tack cloth to remove the remainder of it.
- At present the fun office of ageing your new wood, or ageing the newly cutting edges of your former wood begins. If you're using old wood, brush the newly cut edges with your mixture of vinegar and steel wool. If you're using new wood, castor the whole board including the edges. Let dry. The reason I desire you to use this technique to stain the wood and not a regular stain is because a) it perfectly replicates aged wood and b) it's completely nutrient safe. Alternately, you can skip the vinegar and steel wool stain and but condition the wood with your food prophylactic wood terminate, which will darken the wood and give information technology a glow. Don't forget the newly cut edges.
Notes
- Here'due south my tutorial on making your own beeswax wood conditioner.
- Here'southward my tutorial on making food rubber stain out of steel wool and vinegar.
- Knots are harder to cut through than regular forest, and then when you become to them just exist prepared.
- Soft forest like pino, fir and spruce are much easier to work cutting with a jigsaw and sand. Hard forest like oak, maple or walnut are much harder to cut BUT they can also be used as cut boards then.
- Take a good look at the woods. It'll tell you what to do with information technology.
- Your chalk line will be thicker than your cut line. Remember which side of your chalk to cut on to make your board the right size.
- If yous're new and unsure of yourself with woodworking tools similar a jigsaw, make a cutting board with merely straight lines. Curves are harder, and so the straight lines will build up your confidence.
- Don't forget to round off any newly cut edges.
- Don't try to cut anything without clamping information technology down get-go. Always.
- To brand newer wood look like an older cut/cheese board scar it using a pocketknife or pizza cutter.
Just a reminder from the top of this post that this DIY charcuterie board would make a actually dainty hostess souvenir, either past itself or as the base for other fun stuff instead of a basket.
How to turn this into a gift handbasket.
Lay out your cellophane and and so lay the board on tiptop of it.
Acme the lath with a good cheese, a box of unique crackers, some type of fig or cranberry jam that goes with the cheese and crackers, a bottle of vino or olive oil (for peak) and some sprigs of pine and bandbox.
Washed! Just like that you take a thoughtful, inexpensive gift for someone.
Unlike this year's new give-and-take – COVID – this is something you'll be happy to give to someone.

How To Make A Charcuterie Board Out Of Wood,
Source: https://www.theartofdoingstuff.com/cheese-board/
Posted by: gonzalesboboy1965.blogspot.com
0 Response to "How To Make A Charcuterie Board Out Of Wood"
Post a Comment